.png)
Managing Goals
Introduction
Goals allow employees and managers to track progress to professional objectives over time.
Creating a Goal
On the goals page, each employee has a green Create Goal button at the top to create the goal. Follow the prompts to create a goal.
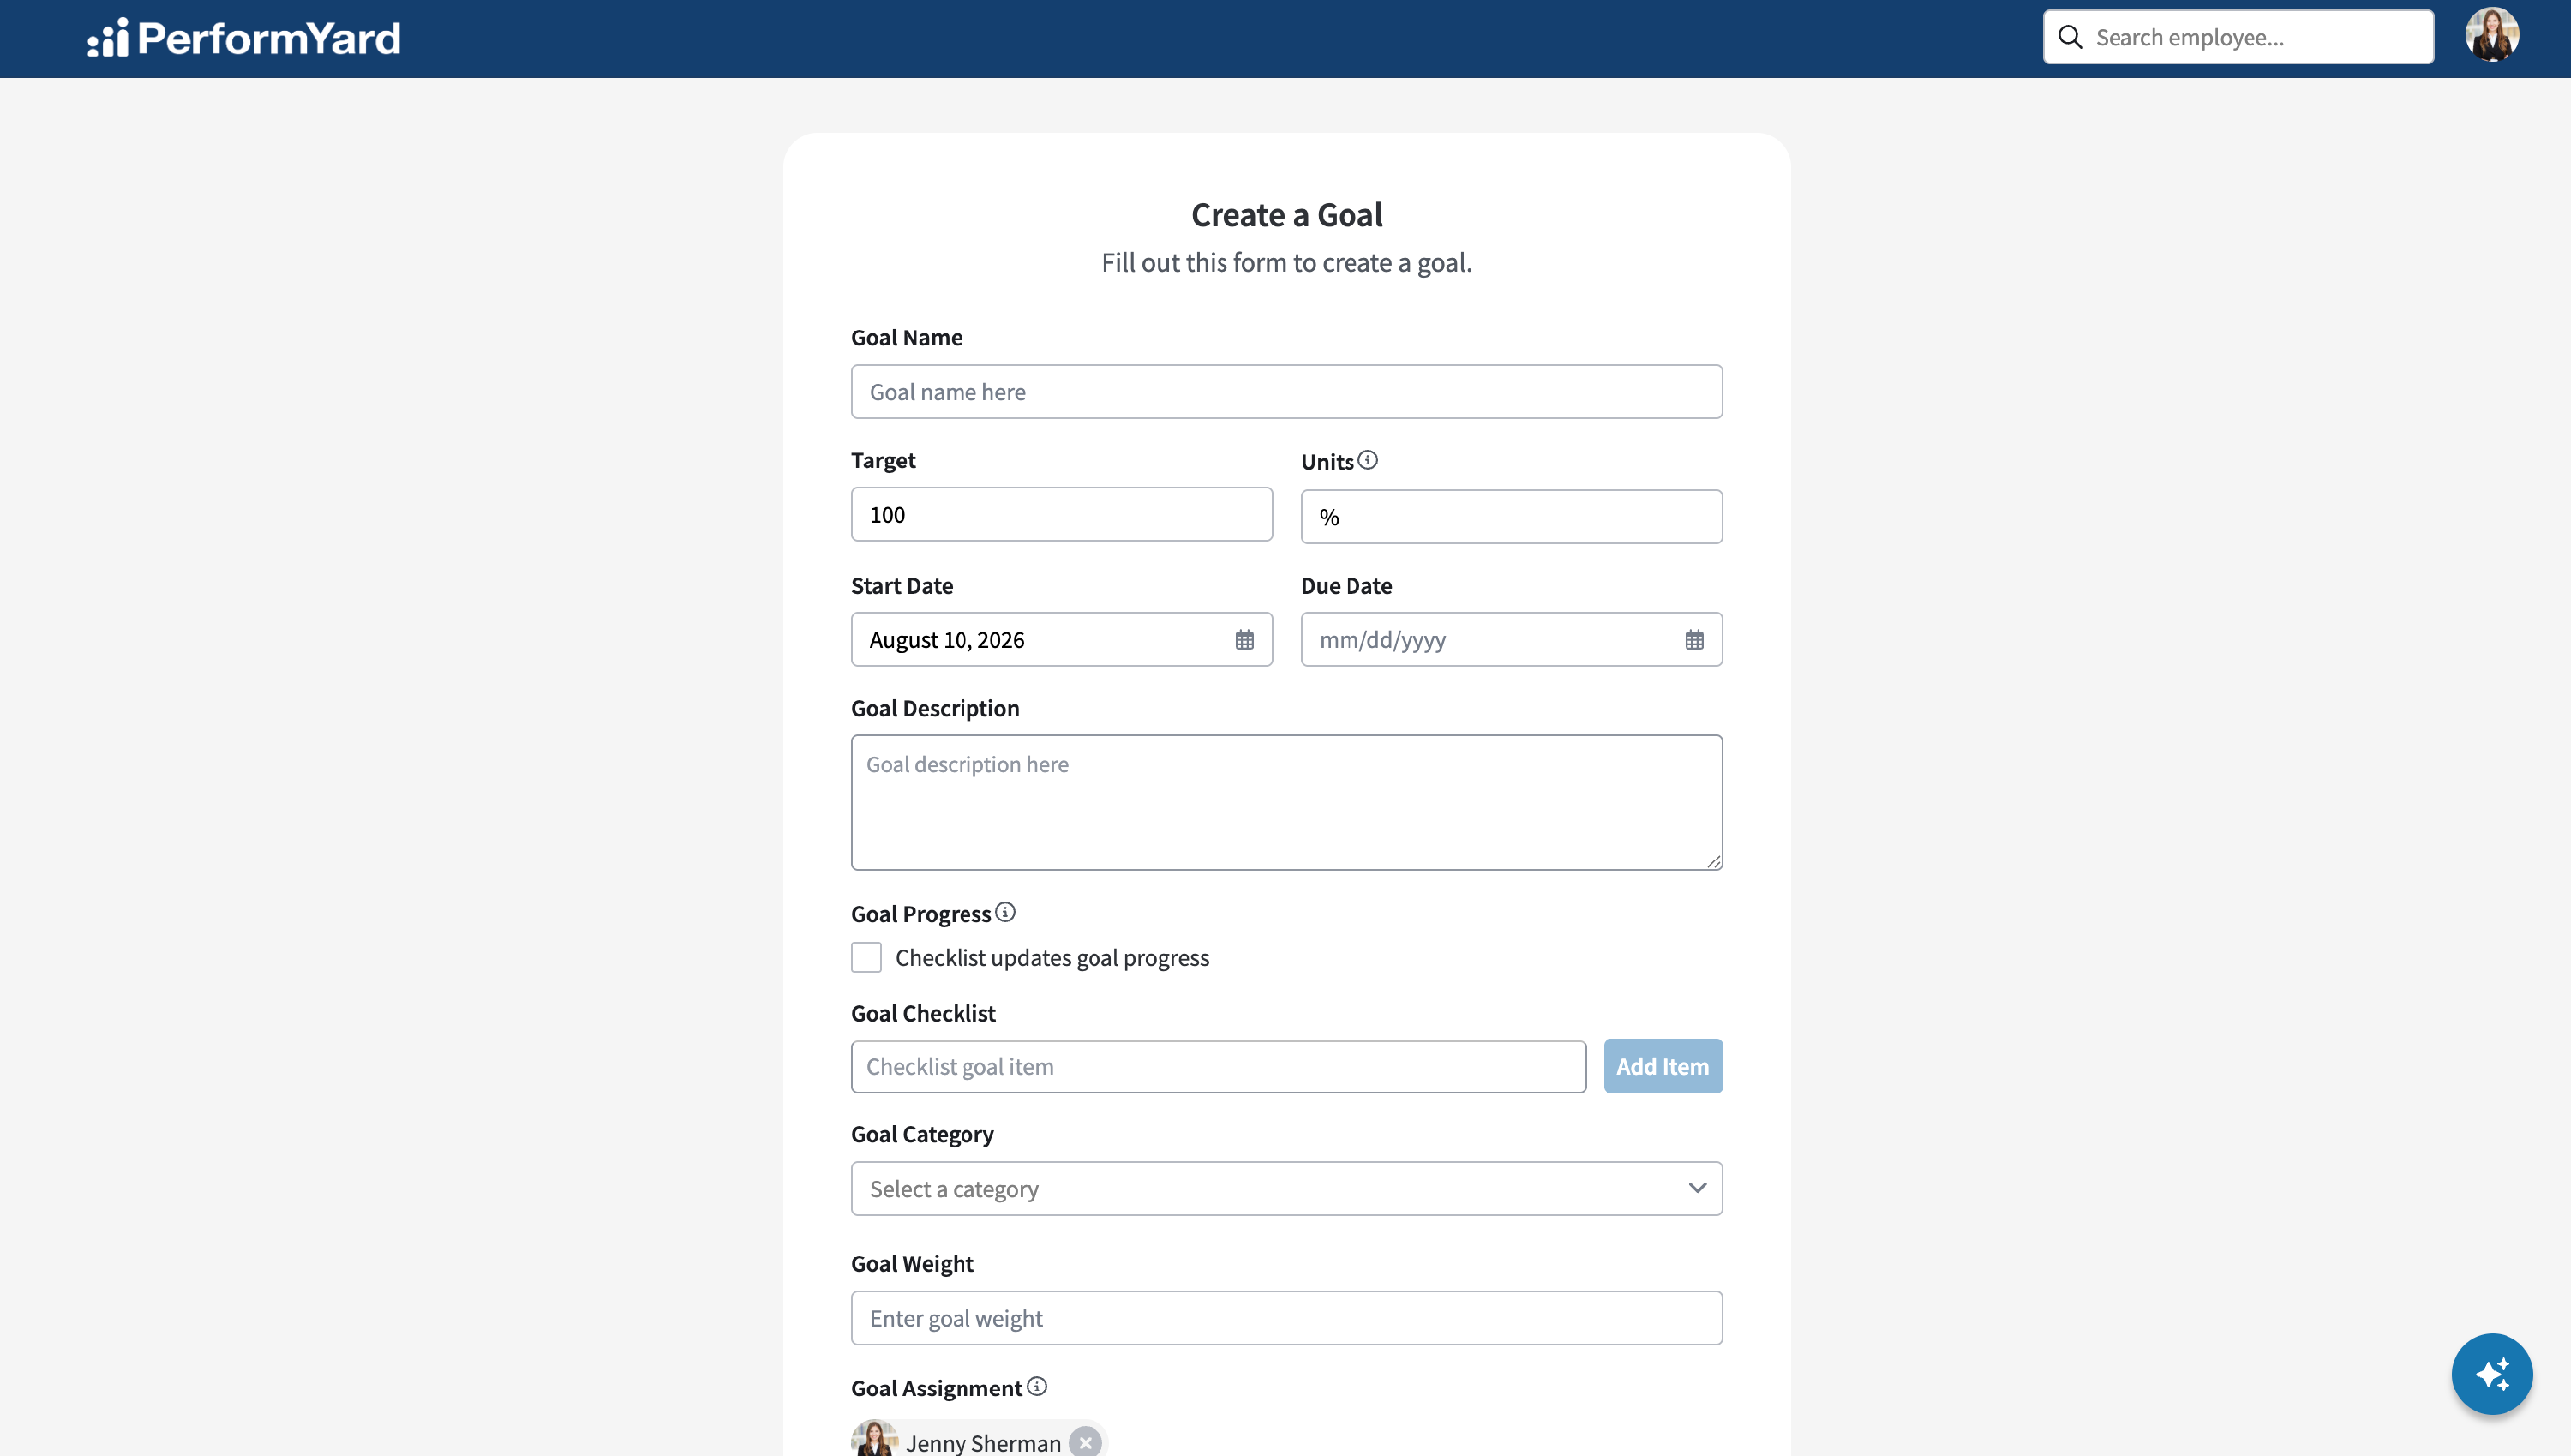
Items to include when creating a goal include:
- Goal Name: The title of your goal. This is a required field.
- Target and Units: The means by which you will measure progress. This defaults to 100%, but can be changed to match the specific goal. Target is a required field.
- Start Date: The date when the goal begins, defaulted to the day of creation. This is a required field.
- Due Date: The date when the goal is expected to be completed.
- Goal Description: The details of the specific goal.
- Goal Category: The associated tags assigned to the goal. On the Administration > Goals page, admins can manage their categories and make this a required field for their organization.
- Goal Weight: The weight of a goal compared to others assigned to the same employee.
- Goal Assignment: The person to which you are assigning this goal. This defaults to the employee to create a single goal.
- Note: A manager, admin or group administrator (with proper permission) can assign goals to others in a singular or bulk fashion.
- For a single goal, use the drop down to select that person from the list of available users.
- To assign the goal to multiple people, select the blue link where you can then choose from the variety of people for whom you have that permission.
- Note: A manager, admin or group administrator (with proper permission) can assign goals to others in a singular or bulk fashion.
- Transparency Level: Choose between Public (where your goal can be linked to or from others via the goal alignment) or Private (where the goal is only accessible to the employee, their manager/contributors, and administrators). When a goal's transparency is Public, colleagues outside of the chain of command can see the goal name, assignee, status, due date, and progress bar - but they cannot click into the Goal Detail page to access additional details.
- Goal Level: Choose whether the goal will function as an organization-wide objective that the rest of the organization can align their goals to.
- Goal Alignment: Select another goal within the organization that this goal supports. You can search goals based on Title, Assignee or Categories. By default, this option is available for Public goals only. Premium customers with Private Goal Alignment enabled can also align Private goals—see the Private Goal Alignment (Premium) support article for details.
- Goal Progress: Choose whether the goal prompts for a progress update when a checklist item is checked or unchecked. Progress updates will attempt to account for the ratio of complete/incomplete checklist items and the Goal assignee's target value.
- Goal Checklist: Add items to be included in the goal checklist upon creation of the goal.
Click the Create Goal button to create the new goal. Once the goal is created, a box will appear in the lower left that provides a link to that goal (or a link to a list of goals created if you had created the same goal for multiple people). The page will also refresh to be blank where you can create another goal. To return to your goal list, click the Goals link in the navigation bar at the top.
Updating a Goal
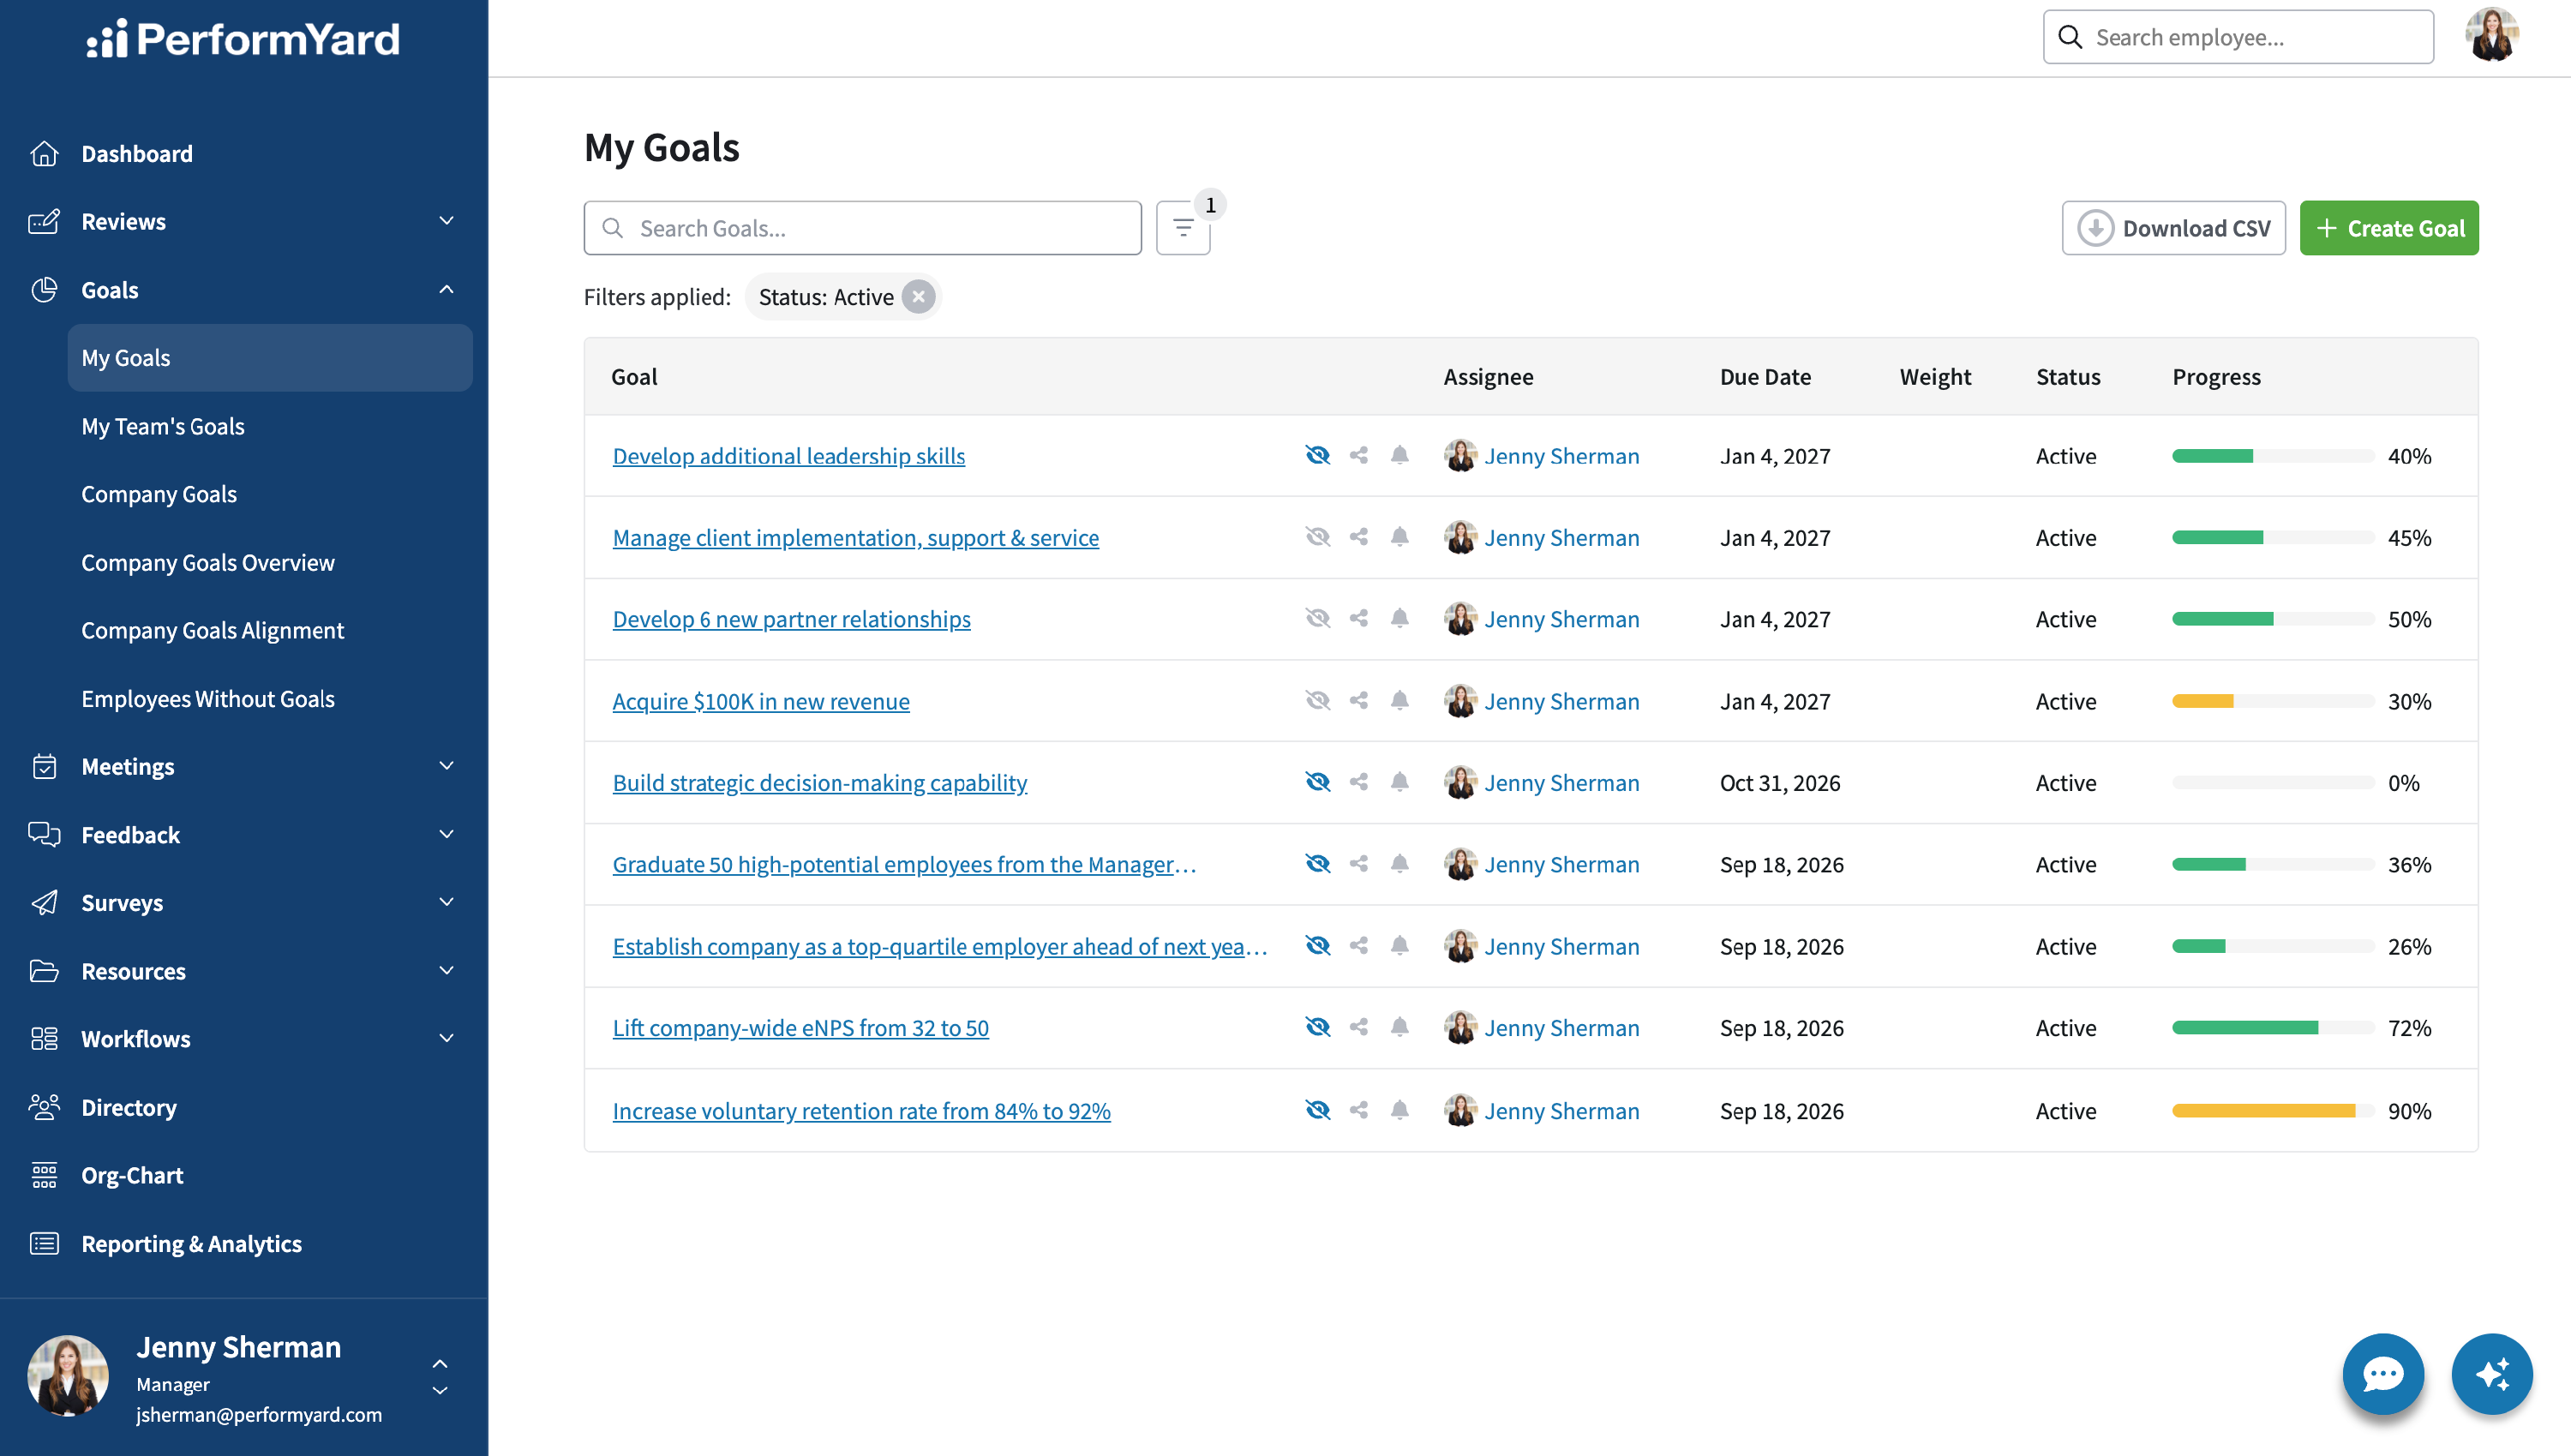
Once a goal is created in PerformYard, it's easy to update progress and maintain goal information. The Goals dropdown within the navigation has your list of “My Goals” and, if you are a manager, a list for your team’s goals under My Team's Goals. At the top of the page, you'll have a search box that allows you to type a goal name. Additionally, you'll have a filter button, a Create Goal button and a Download CSV button. Beneath you'll find a list of any filters currently applied; these lists default to active goals, but you can use the filter option above to further change the filters.
In the goal list (which is sortable by clicking on the column headers), you’ll see the goal name, visual indicators for transparency/goal sharing/unread updates, assignee (which could be someone else that has shared their goal with you), due date, status and progress for the goal, which is colored according to the outlook.
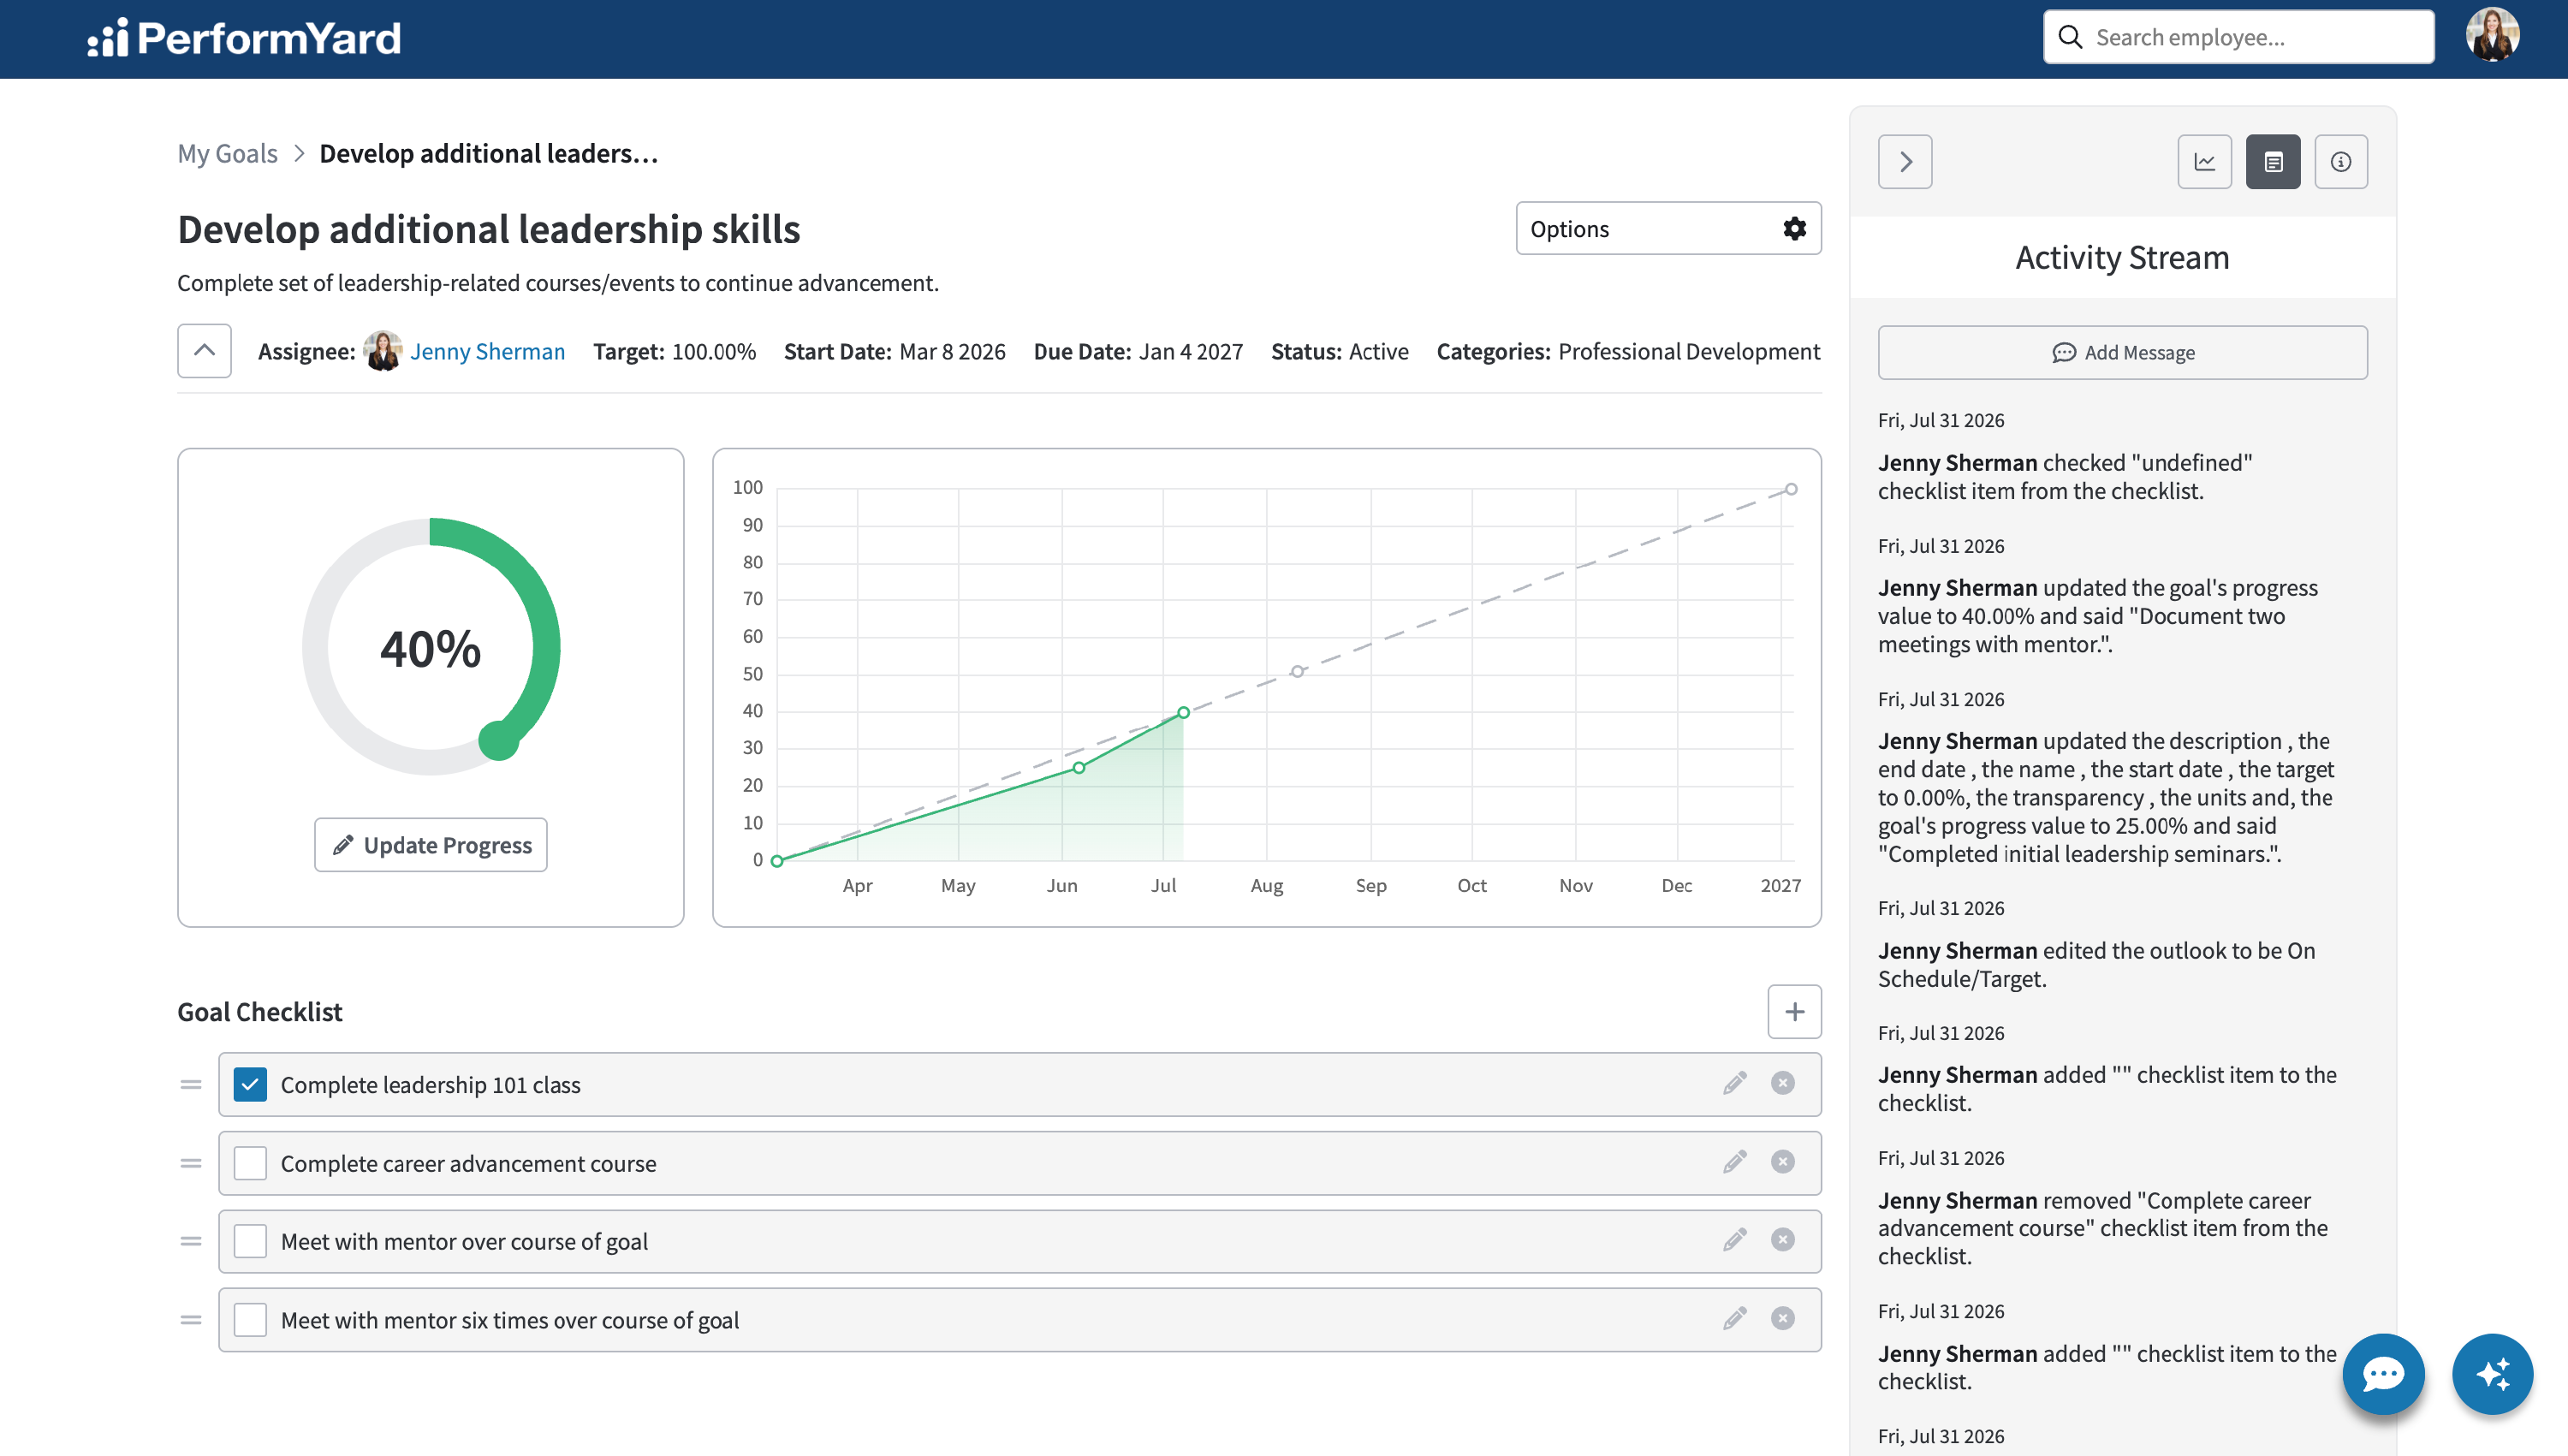
To work with a goal, click on the goal's name. You'll see the basic information of the goal at the top, including the assignee, the goal's overall target, due date, and any categories the goal falls under. On the right side, you’ll see a side panel containing a number of different options to view updates or detailed information about a goal.
Specifically, the right side panel contains three different sections that break down information about a goal in a number of ways. Below is an explanation of each:
- Goal Progress - The Goal Progress section contains a history of goal progress updates and checklist completion records sorted by As Of date. This is a useful view if a manager wishes to see a filtered view of updates solely about how well the goal is doing.
- Activity Stream - The Activity Stream section contains a list of all actions taken against the goal, including other actions not listed in the Goal Progress section like records of changes to the text of a goal's description, when the goal is shared with others, or when checklist items are created for a goal. Updates in this section are sorted by the date the change was made rather than the As Of date, so the sort order of information may be different than what you see in the Goal Progress section.
- Goal Details - The Goal Details section contains a list of attributes about the goal. These include fields not displayed at the top of the page like a goal's alignment, weight, or when the goal was created.
The Options menu has a few choices for things you can do to the goal.

Within Options, you can:
- Edit: Allows you to change the name, description and other details of the goal.
- Update: Prompts you for a new value and comment, along with as-of date and outlook.*
- Share Goal: Brings up a list of current employees who share the goal and the ability to add more employees.
- Duplicate: Allows you to create a new goal using this goal’s parameters as a starting point.
- Archive: Removes the goal from your Active list but not mark the goal as Complete. To delete a goal it must first be archived, once archived a Delete option may appear under the Options menu.*
- Mark as Complete: Prompts you to enter an optional message.
*While all users can archive goals, employees and/or their manager may have the permission to entirely delete a goal depending on the organization's permission settings, which are determined by your organization's administrators. Administrators can always delete goals entirely.
A goal can be updated by selecting one of three separate sections of the page:
- By selecting the Update Progress button under the Option dropdown
- By selecting the Update Progress button displayed in the chart section
- By selecting the + icon in the chart section that appears when you hover over the line graph
When updating a goal you can provide an updated value for the goal, a comment about it, an as-of date for the update and update the outlook.*
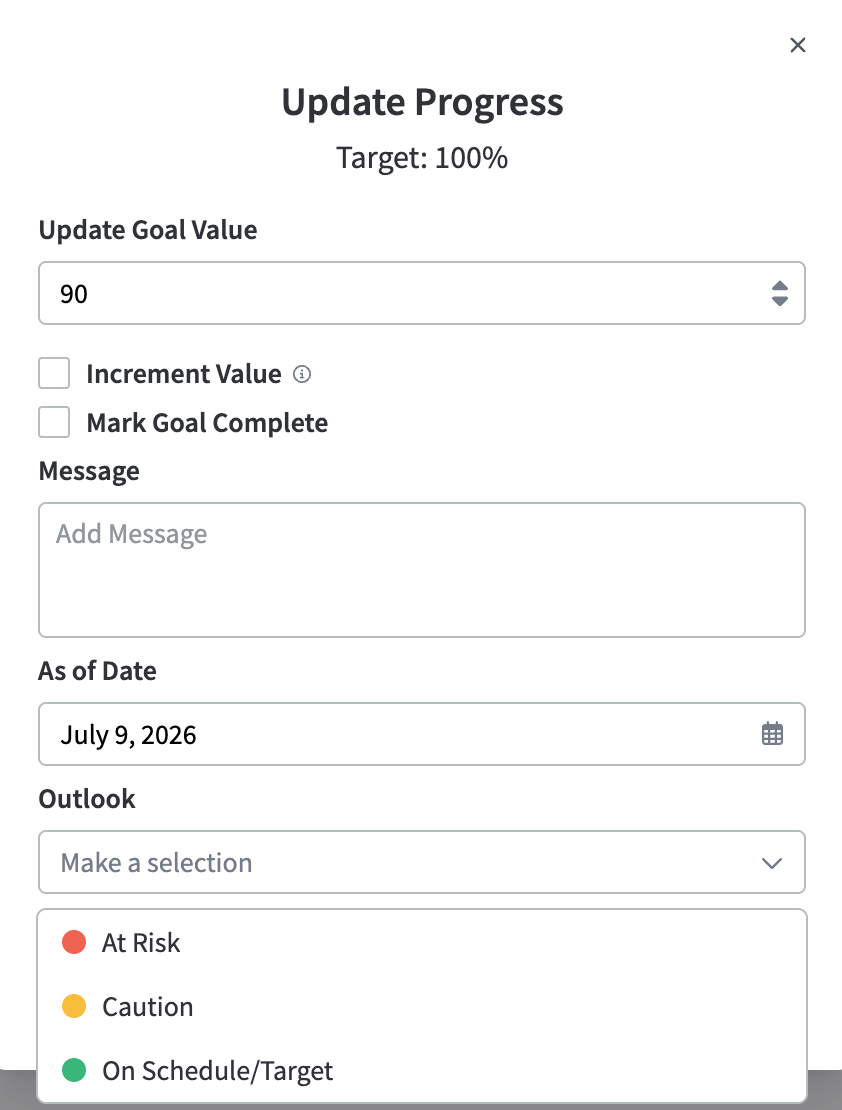
A note about the Increment Value option. This will add the number entered in the Value section to the existing value of the goal rather than replace the value. For example, if your goal is currently at 40% and are now 55% complete, you could do either:
- Enter 55 in the Value and leave the increment value box unchecked.
- Enter 15 in the Value and select the increment value box. This will add 15 to 40, giving you a new value of 55.
As a reminder, the Value you enter is always relative to the target and units that were set when you created the goal.
You can also click the Comment button at the top of the activity stream to make a comment in the goal history.
The checklist at the bottom allows you to create and "check off" activities that support completion of the goal. You can add as many checklist items as desired and check off completed items as progress is made.
If your goal has enabled the "Checklist updates goal progress" option, checking or unchecking a checklist item will also prompt for an update to the goal's progress to ensure that completion of checklist items also properly update's the goal's overall progress in relation to each checklist item.
If the "Checklist updates goal progress" option is enabled, the goal progress update that appears will also suggest a new progress value that represents the ratio of complete/incomplete checklist items so that a goal's checklist progress matches the goal's overall progress. For example, if a goal has a target value of 100% and 4 checklist items, completing one checklist item will suggest that the goal's progress be updated to 25%.
Finally, enabling the Mark Goal Complete checkbox will mark the goal as completed in addition to entering the provided progress update.
*The following people should be able to remove goal progress updates: the assignee's chain of command, the assignee's contributors, anyone the goal has been shared with, and as always any billing admin/admin roles.