Creating review cycles (admin)
Review cycles are the assignment of the same review template to a set of employees. These work well when you are going to be doing the same review for a group or perhaps employees in similar positions. Cycles also provide reporting and visualization where you can see review results across multiple subjects. To create or manage a review cycle, navigate to the Reviews page under the Company Info menu. You will see listed any existing cycles; you can also navigate to the All Reviews list to see any review done in PerformYard.

To set up a new review cycle, click New Review Cycle to complete the steps for creating a cycle: establishing the basic information for the cycle and selecting the review subjects.
For the basic information, complete the following:
- Cycle name: Give the review cycle a short, recognizable name for future reference
- Lock reviews from non-admins: Selecting this option will only allow Admins to make process changes to the reviews once set up. This will prevent managers from making changes such as adding forms, changing authors/signers, modifying visibility and updating due dates.
- Group-specific cycle: Select a group if you only plan to have subjects from one group in the cycle. This selection also provides access to the cycle for any group administrators for the selected group. This field is optional for Admins/Billing Admins, but required for Group Admins to select from groups they manage.
- Which review template would you like to use?: Choose the template you have set up for this cycle. As a reminder, the template provides the basic setup for the forms, authors/signers, days to complete, visibility and redact author setting.
- Start date: Select the date and time you want the review cycle to begin. This defaults to the default review cycle start time selected in your Company Settings on the start date, but can be modified by clicking the clock icon.

Once you have selected the template and start date, all of the forms in the template will be listed. This will display each form, the authors/signers as in the template, due dates as calculated based on the start date/time and the template days to complete, visibility and redact author setting. Note that editing the redact author setting is not available to Group Admins.

If you want to change the setup for any form, click Edit beneath the setup parameters for that form. You can update/add/remove the authors and signers, due dates, visibility and the redact setting. As a reminder, these are intended to be generic and will be set up for each subject selected. After making changes, click Save.

You can Delete any form from the setup by clicking Delete. This form will not be added to the reviews when set up.
Select Add New Form at the bottom of the page to include an additional form in the cycle setup.

Add forms by searching for form name. Once a form is selected (Goal Creation Form in the sample below) enter the remaining parameters (author/signer, due dates, visibility and redaction). This form will be assigned to each subject when the cycle is launched.

If after selecting your template and start date/time, you choose to edit the start date and/or time, you will be prompted with an option to Recalculate form dates that will use the days to author/sign from the template to redefine the due dates in the forms to be assigned based on the new start date/time. This is not required, but would allow you to set the form due dates and then change the start date without impacting the due dates.

At the bottom of the page beneath Add New Form, you will also have an option to Reset template forms that will cancel any changes you have made to the forms and return you to the original state after you initially selected the start date and template (adding back forms you deleted, removing forms you added, recalculating due dates, and adjusting visibility/redact authors).

When you have the cycle setup complete, click Next to select your subjects. Begin by checking the box to the left of the employee names to add individuals to the cycle one-by-one.

If you have not pre-selected a group, you may use the search to find employees or use the Add Group button (to the right of the search bar) to either select All Employees or employees in a specific group. You can use this function to add more than one group.

Each person in the selected group will then appear with a check to the left of their name.

You can check and uncheck employees to be included. Then you can display just those employees that have been selected using the Show only selected employees checkbox to the upper right of the table.
If you selected a group in the Group-Specific Cycle field (the Customer Support group in the example below), the subjects list will be pre-filtered to only display employees in the group. You can then use the Add Group button to select all employees in the group.

Click Create Cycle to begin the process of setting up your cycle. Note this may take a few minutes to set up. Once ready, the page will refresh to show you the cycle status page.
Once a cycle has been created, you can click on its name to see the cycle details. Cycle details include:
- Cycle name
- Start date
- Due date
- Number of review subjects in the cycle
- Pie charts indicating the number of reviews and a breakout by review status
- Bar charts indicating the overall, author, and signer completion
If you have access to automated reviews and have chosen to automate the cycle you are creating, you will also see the following information about your review automation:
- The review automation type
- If the automation is enabled or disabled
- When the automation runs
- When the automation will stop running
As well, you'll see a list of each subject reviewed in the cycle, including a link on the left to Open Review. Additionally you have indicators for if the review has unassigned forms or includes external reviews. Then there are bar charts for author completion, signer completion and form completion. The example below shows a cycle that already has progress; until the cycle has started and forms have been authored/signed, the progress bars will appear blank.

An Options menu in the upper left includes links to:
- Visualize data, where you can create visualizations about the reviews in the cycle (covered here)
- Edit the cycle’s parameters to change the name, start date (if the cycle has not started) and update various form parameters (covered here)
- Add subjects to the cycle, where you will select more individual employees to include
- Download CSV to export the answers to all forms in the review cycle for all subjects
- Copy the cycle to create a duplicate where you can edit parameters of the duplicate cycle
- Close cycle, where you can close out each review in the cycle
- Delete cycle, where you can remove the cycle (only available for cycles that have not yet started or where there are no reviews in the cycle)

Once a cycle has been set up, you can include additional subjects in the review cycle. This is helpful for cycles that are ongoing or if you forget an employee during initial setup. This is also a two-step process as was creating the cycle.
Initially you will see the name of the cycle to which you are adding the subjects. Then select the Lock option if you want to limit process changes to Admins. If this is a group-specific cycle, the name of the selected group will appear. This selection will also then determine available subjects in the next step, only showing employees in the group that do not yet have a review. You will also see the name of the template originally used for the cycle. Enter the start date/time for the reviews you are adding. This will then populate all of the forms based on the template and start date/time as occurred when initially creating the cycle. The remaining options for making modifications will remain the same. 
Click Next to select from employees not already in the cycle to add to the cycle. Once you have selected from the available employees, click Add Subjects. Any employees already in the cycle will not be available to be selected again as an employee can only appear in a cycle once. Note that after you are returned to the cycle page, you may need to refresh the browser window to see all subjects listed.

For any review cycle, you can view information about each subject's review, including due date, progress and the number of unassigned/external review forms. You also have options to Open Review, on the far left which will let you see the details of the forms in the review, and Delete, on the far right which will remove the review entirely.

There are additional search and filter options available on any cycle above the table of employees being reviewed. To search, just type in the name of the person whose review you want to find.

To filter, click the Filter button to the right of the search. The filter includes a number of options on those reviews, such as:
- Unassigned forms
- External forms
- Due date, before or after
- Author, signer and overall progress
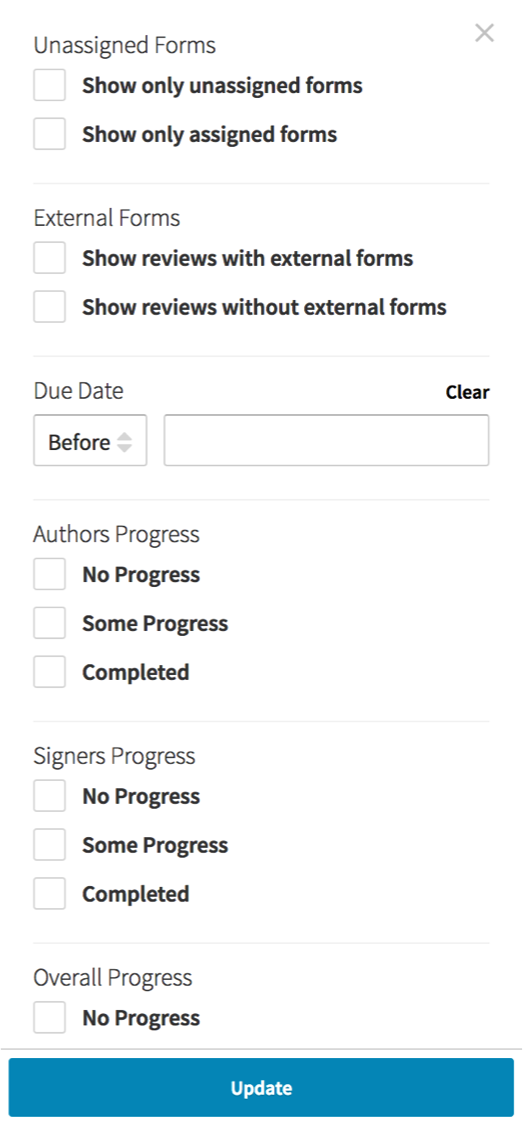
Click Update after selecting your search parameters, and the table of employees being reviewed will update to just those that meet the filter criteria.